Quantcast
Channel: tagDiv support
Viewing all 280 articles
Browse latest View live

Smart List

$
0
0

1. Create a New Post

2. Write your Smart List Content:

  • Title
  • Image
  • Description

Note: The Smart List will use the title to generate the list. In our example we are using Heading 3 for Titles and we need to choose the same size in the Smart List settings section from Title tags to be able to generate the list.

You can choose any size you want from Heading 1 to Heading 6

3. Select Your Smart List Style

– at the bottom of your post you will see the Smart List settings.

4. Publish Post

smartlist

Smart List Style 1

smart-1

Smart List Style 2

smart-2

Smart List Style 3

smart-3

Smart List Style 4

smart-4


Limit the Posts Number on Homepage

$
0
0

If you are using:

  • Pagebuilder + latest articles + pagination 

template for your Homepage and you want to limit the numbers of your latest articles go to Homepage loop filter and set Limit post number

post-numbers-homepage

Enable/disable comments on the post page

$
0
0

1. Got to your Post page and from Screen Options (top-right corner) be sure that you have checked Discussion.

2. Now go to the bottom of you page and look for Discussion section and verify to have the boxes checked to Enable Comments.

3. To Disable Comments uncheck the boxes.

comments

More Articles / Stories Box

$
0
0

1. Go to Theme panel > Post Settings > More Article Box

2. Click enable More Articles button.

3. Save the settings.

If you want to change the default behavior of the MORE STORIES BOX check out the other options.

more-articles

more-stories-box

Box Layout

$
0
0

After you added the background image or the background color, the theme will start using the boxed layout!

To go back to the full box you only need to remove the background image or background color!

If you want to switch the site to boxed version you have to use a background image or to choose a color for the background, follow the steps bellow:

1. For a background image, go in Theme Panel -> Background and upload an image as background.

image-bg

2. For a color background go in Theme Panel -> Theme Colors and choose a color from Background Color.

color-bg

Biography and the social author

$
0
0

1. Go to Users > Your profile.

2. In the Contact Info area add your social profile links that you want to show.

3. In the About Yourself area write a short description about yourself.

4. In the Avatar area add your image.

5. Save Changes

update-profile

profile-site

Customize the categories

$
0
0

To customize a category go to the Theme Panel > Categories, and select a category that you want to edit.

customize-categories

How to change the excerpt length

$
0
0

Notice: Adding a text as excerpt on post edit page (Excerpt box), will overwrite the theme excerpts.

To change the excerpt length follow this steps:

  • Go in Theme Panel -> Excerpts
  • You have to choose Excerpts Type (We strongly recommend that for Chinese, Japanese, Arabic language to choose EXCERPTS TYPE: On Letters

Now you can change the excerpts when you’d like !

excerpt


Reviews

$
0
0

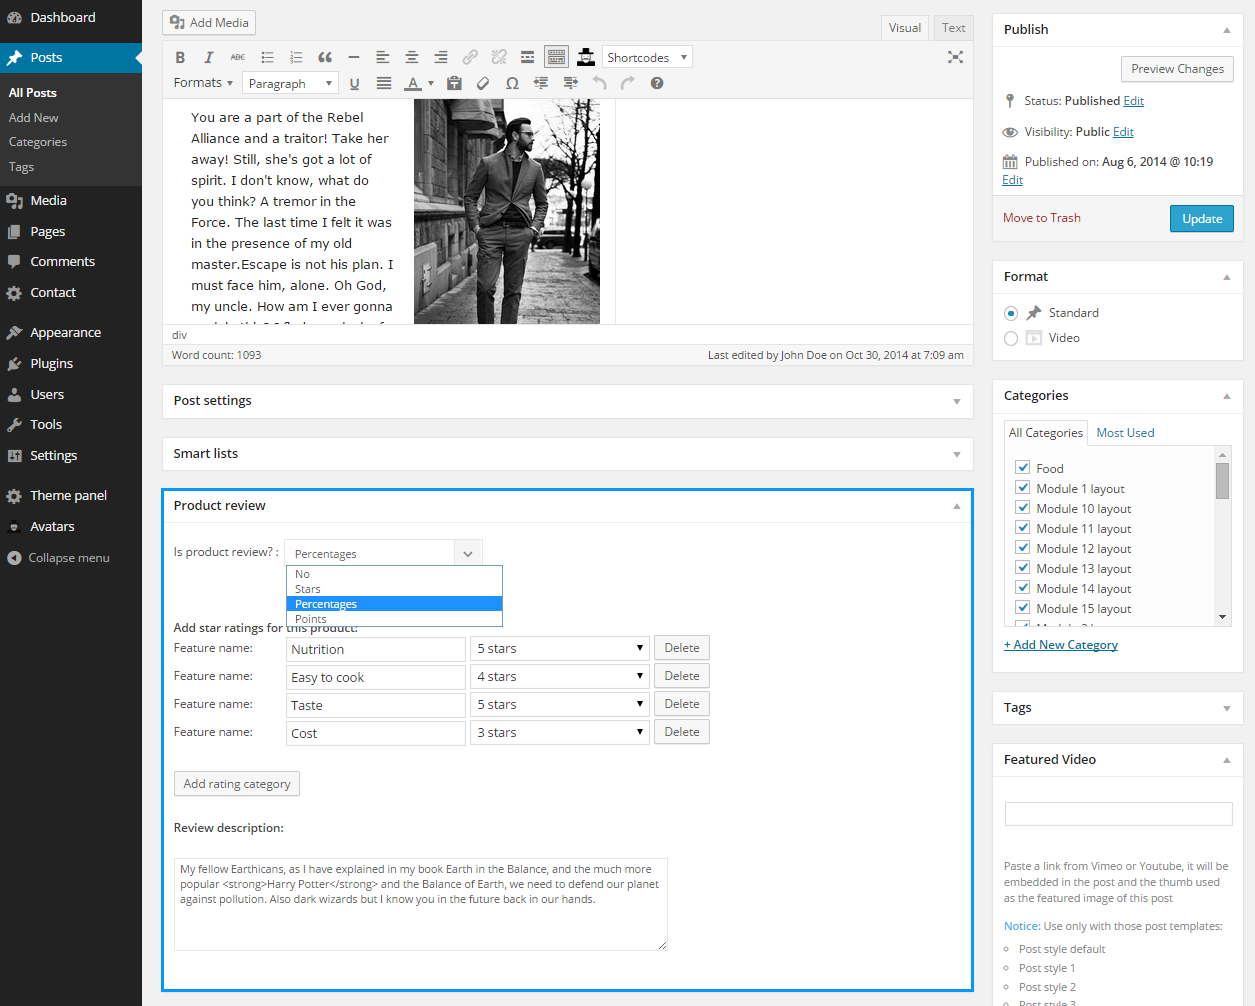
You can easily create product reviews using our theme.

On the Post page were you want to use the review system you will see the Product Review section.

You can create unlimited review criterias and rate it. (rating categories)

Also you can write a short review in the Review description box.

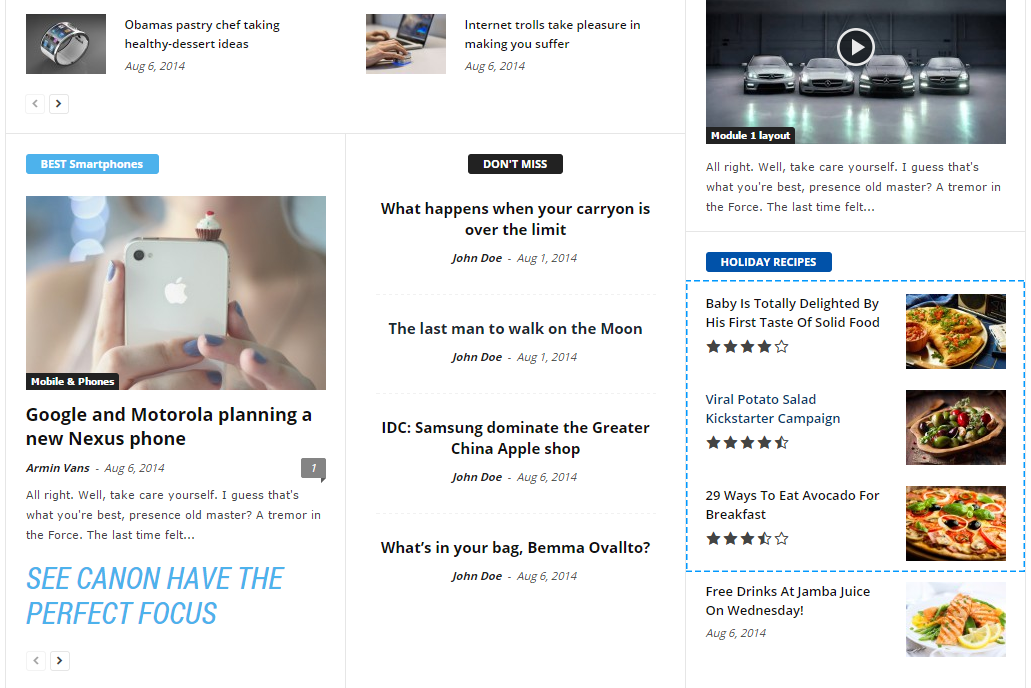
The theme support 3 types of review:

post-review

1. On the Post page the review will be at the end of the post.

post-website-review

2. On Pages the review will be visible simplified.

on-page-review

Custom Typography

$
0
0

There are 3 types of fonts that you can use with Newsmag:


  1. Custom font files 
  2. Typekit.com fonts
  3. Google fonts

To edit this custom fonts go to Theme Panel > Custom Typography > Add Custom Fonts button.

In the new panel you can start uploading your custom fonts.

custom-fonts-panel

1. Custom Font Files

1. Go to Theme Panel > Welcome > Custom Fonts

2. Add the link to the font file in .woff format, and the font-face name  in the Custom Fonts – Font Files section and click save settings.

3. You can convert your font files from any format into .woff format using  http://www.fontsquirrel.com/tools/webfont-generator . From here you will obtain a css file where you get the font-face name.

4. Once you hit the ‘Save Settings’ button you will see the font-face name in the CUSTOM TYPOGRAPHY panel in all sections, in FONT FAMILY pull down

2. Typekit.com Fonts

1. Create an account typekit.com. Once you have selected your fonts open the’Launch Kit Editor’ popup

2. On this page click the ‘Embed Code’ then click the link ‘Show advanced’ to copy the advance javascript code:

3. Paste it here:

4. In the ‘Launch Kit Editor’ click on the font and then click on the ‘Using fonts in CSS’ link:

5. From here copy the font face name:

6. Paste it here:

7. Then you need to add your domain:

8. And the last step will be to publish your settings from typekit.com:

You will see the font-face name in the CUSTOM TYPOGRAPHY panel in all sections, in FONT FAMILY dropdown

3. Google fonts

In the Google fonts section you can specify what type of support your google fonts have, default is ‘Latin’

You can find the Google fonts in the CUSTOM TYPOGRAPHY panel, in all sections, in FONT FAMILY dropdown.

4. Font stacks

1. You can edit the Fonts stacks in the td_fonts.php file.

2. You can find the Fonts Stack in the CUSTOM TYPOGRAPHY panel, in all sections, in FONT FAMILY dropdown.

Footer

$
0
0

footer

1. Top footer

The Top Footer columns layout can be changed from Theme Panel > Footer section and select your Layout.

top-footer

Predefined Footer Content

Using our predefined content you can easily set up your footer.

You can choose to not use our predefined content and create your own style using widgets.

predifined-content

website-predifined-footer

Add Your own footer content

  1. Go to Appearance -> Widgets
  2. Here we have 3 sidebars: Footer1Footer2 and Footer3.
  • Drag what widgets you like in each Footer sidebar.


Note: By default predefined columns are active. You will need to deactivate from the settings above if you don’t want that content in your footer.

footer-widgets

2. Bottom footer

On bottom of the footer you can add your copyright text and a menu with some links.

  • To add your copyright text, go to Theme Panel > Footer and under Sub Footer settings add your text in the required field.
  • To add your menu links go to Appearance > Menus, create a menu and select it from Footer Menu drop-down.

Don’t forget to click on SAVE SETTINGS button.

subfooter

Smart Sidebar

$
0
0

The smart sidebar is an affix (sticky) sidebar that has auto resize and it scrolls with the content.

To Enable the Smart Sidebar navigate to Theme Panel > Template Settings > Smart Sidebar and activate the button.


Note: The following widgets are not supported in the smart sidebar:

  • [tagDiv] Block 14
  • [tagDiv] Block 15
  • [tagDiv] Slide

Note: The smart sidebar reverts back to a normal sidebar on iOS (iPad) and on mobile devices.

smart-sidebar

smart-sidebar-site

Block Settings Overview

$
0
0

1. Category filter – A single category filter. If you want to filter multiple categories, use the ‘Multiple categories filter’ and leave this to default.

2. Multiple categories filter – Filter multiple categories by ID. Enter here the category IDs separated by commas (ex: 13,23,18). To exclude categories from this block add them with ‘-‘ (ex: -9, -10).

3. Filter by tag slug – To filter multiple tag slugs, enter here the tag slugs separated by commas (ex: tag1,tag2,tag3).

4. Authors Filter – Filter by author. Shows only posts made by this author.

5. Sort order – How to sort the posts.

6. Post Type – Filter by post types. Usage: post OR post,events,pages ; write 1 or more post types delimited by commas.

7.  Limit post number – If the field is empty the limit post number will be the number from WordPress settings -> Reading.

8. Offset posts – Start the count with an offset. If you have a block that shows 5 posts before this one, you can make this one start from the 6’th post (by using offset 5).

block-settings-1

9. Custom title for this block – Optional – a title for this block.

10. Title url – Optional – a custom url when the block title is clicked.

11. Title text color – Optional – Choose a custom title text color for this block.

12. Title background color – Optional – Choose a custom title background color for this block.

13. Border top – By default all the blocks have a border at the top. You may wish to remove that in some cases (like when the block it’s the first in a sidebar).

14. Color preset (background style) – Choose a color preset for this block. You can customize the presets in Theme panel -> Block settings.

15. Ajax dropdown – filter type – Show the ajax drop down filter. The ajax filters (except by popularity) require an additional parameter. If no ids are provided in the input below, the filter will show all the available items (ex: all authors, all categories etc..).

16. Ajax dropdown – show the following ID’s – The ajax drop down shows only the (author ids, categories ids OR tag slugs) that you enter here separated by comas.

block-settings-2

17. Ajax dropdown – Filter default text – The default text for the first item from the drop down. The first item shows the default block settings.

18. Pagination – Our blocks support pagination.

19. Infinite load show ‘Load more’ after x pages – ONLY FOR INFINITE LOAD pagination: Shows ‘load more’ button after x number of pages. Leave this blank to load posts forever when infinite load is set for ajax pagination.

block-settings-3

Unique Articles and Offset (Video)

$
0
0

Unique Articles

This option removes duplicate posts from the page, it only works on static pages, is you use pagination (including load more button and infinite load) it will generate duplicates on the second page and you have to use the offset feature.

Offset

This option removes duplicate posts from the page and it works with pagination (including load more button and infinite load).

How to insert Ads in custom areas of the website!

$
0
0

NOTE – To insert Ads in custom areas of the website you will need to edit the core files of the theme.

WARNING – If you want to Update the theme after you made custom changes to the core files all your changes will be lost!

Adding custom Ads under the menu and before the footer.

1. Go to Theme Panel > Ads and set the ad section that you want to use. We will use Custom ad 1 but you can use any of the ads sections.

custom-ad-single-post

2. You will need to create a New Page and insert the Ad box block from Visual Composer.

  • From the pop-up select the Ad Section that you set it from the Theme Panel, in our case Custom ad 1
  • After you inserted the Ad box block switch to Classic Mode and select the Text tab.
  • You will need to copy the shortcode from here. This will be the code that you will insert in page were you want your ad to be visible.

ad-box-sortcode

3. After you have the shortcode you need to go in the theme core files and put the code were you want to be visible on your page.

  • In our case we need to go to single.php

The code that you need to use is:

<?php echo do_shortcode(' '); ?>


Inside this function you can add any other shortcode from our theme.

We will use the shortcode from the Ad box that we copied from the wordpress editor.

In our case the final code is:

1. Insert Ad under the Menu

under-the-menu

2. Insert Ad before the Footer

before-footer

4. Example how the Ads are positioned under the menu and before the footer

Under the Menu

under-the-menu

Before Footer

before-footer


Custom Date Format

$
0
0

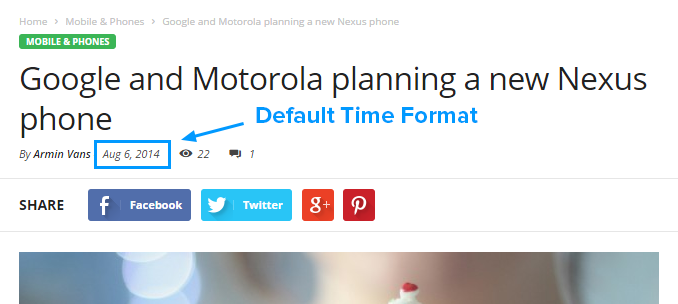
By default the theme has this Date Format:

M j, Y

default-time-format

To change this Date Format:

1. Go to Settings > General

2. Scroll down until you see Date Format section

3. Use one of the Date Format provided bellow:

F j, Y g:i a - November 6, 2010 12:50 am
F j, Y - November 6, 2010
F, Y - November, 2010
g:i a - 12:50 am
g:i:s a - 12:50:48 am
l, F jS, Y - Saturday, November 6th, 2010
M j, Y @ G:i - Nov 6, 2010 @ 0:50
Y/m/d \a\t g:i A - 2010/11/06 at 12:50 AM
Y/m/d \a\t g:ia - 2010/11/06 at 12:50am
Y/m/d g:i:s A - 2010/11/06 12:50:48 AM
Y/m/d - 2010/11/06

4. Save Settings.

NOTE: For more details about Date Format please see the WordPress Codex.

custom-format

Update Newsmag to 1.5

$
0
0

To rename the shortcodes from versions older than 1.5 you can run this SQL statement:

Please backup your database before running this query and replace YOUR_WORDPRESS_DATABASE with your wordpress database name.

UPDATE `YOUR_WORDPRESS_DATABASE`.`wp_posts` 
SET post_content = 
REPLACE(
	REPLACE(
		REPLACE(
			REPLACE(
				REPLACE(
					REPLACE(
						REPLACE(
							REPLACE(
								REPLACE(post_content, 'td_ad_box', 'td_block_ad_box')
							, 'td_authors', 'td_block_authors')
						, 'td_homepage_full_1', 'td_block_homepage_full_1')
					, 'td_popular_categoriesc', 'td_block_popular_categories')
				, 'td_video_vimeo', 'td_block_video_vimeo')
			, 'td_video_youtube', 'td_block_video_youtube')
		, 'td_text_with_title', 'td_block_text_with_title')
	, 'td_slide', 'td_block_slide')
, 'td_social_counter', 'td_block_social_counter')
WHERE (post_type = 'page' or post_type = 'post');

Support Policy

$
0
0

If you encounter issues while using our product please contact our support department. Our main support location is the forum. To access this section you have to create an account, the Item Purchase Code is required, and create a new post on the section dedicated for the theme you bought. Do not post personal information (ex. server username and password), the forum is a public location meaning the other users can see what you post.

Before contacting check if:

  • The issue is not covered in the documentation
  • You have the latest version of the theme and theme recommended plugins
  • Disable 3rd party plugins, most issues are caused by a plugin conflict

Support includes:

  • Guidance on theme features and settings
  • Fixing reported bugs / issues
  • Product related questions or issues
  • Limited minor customization questions, ex. css color change for a section (up to 3-5 sections), if you need customization on more areas or you need more complex modifications you should hire a professional developer to make those modifications for you.

The following issues are not covered by support:

  • Server configuration and complex server-side issues
  • Customization and installation service
  • WordPress general support/howto’s , for this look on wordpress.org forums or check on web for tutorials
  • Support for third party software and plug-ins, or other issues that are not related to our product

When posting an issue:

  • please provide as much information as possible
  • post your site url or if necessary some images which may help us identify the problem, additional information may be requested later by our staff but the solution will come faster if we receive most details from the start
  • if you made modifications on the theme code please mention them and provide a full description

We take all messages in order by date, from the old ones to the newest and we try our best to provide the best solutions.

Support schedule:

Monday – Friday  <<>>  8:00 AM – 17:00 PM

New to wordpress:

If yo’re new to wordpress we advice you to take some wordpress courses before asking for support on our forum, you can find plenty on the web (some are free).

Issues while registering on forum:

If you encounter an issue while trying to register on the support forum please send an email at contact@tagdiv.com

API – Header style – Introduction

$
0
0

Available on: Newsmag V1.8+, Newspaper V5+
The td_api_header_style api call allows you to add a new header style and to modify or delete one of the theme existing header styles. By default the theme uses Header Style 1 which looks like this:

api_default_header_style

The header style can be changed from the Theme Panel -> Header section. If you use the theme API to add a new header style it will appear like this:

api_new_header_style

The theme existing header styles are registered in td_config.php, the code looks like this:

td_api_header_style::add('1',
    array(
        'text' => '<strong>Style 1 - </strong> default',
        'file' => td_global::$get_template_directory . '/parts/header/header-style-1.php'
    )
);

Parameters:

$id (string) (required)

  • the header style id – if you add a new header style the id has to be different from the ones used on the other header styles which are registered in theme, if you plan to modify one of the existing header styles the id has to match with the one you’re planing to modify.

$params_array (array) (required)

  • an array which contains the parameters of the header style (text, file)
Key name
Type
Description
text string the title of the header style, it appears in Theme Panel -> Header -> Header Style
file string the path of the template file


td_api_header_style::add

$
0
0

Available on: Newsmag V1.8+, Newspaper V5+
This api call is used to add header styles to the theme.

Usage:

<?php td_api_header_style::add( $id, $params_array ) ?>

Parameters:

$id (string) (required)

  • the header style id – has to be different from the id’s used on the header styles which are already registered in the theme
  • example of valid $id’s: 77, td_header_style_77 etc.

$params_array (array) (required)

  • an array which contains the parameters of the header style:
Key name
Type
Description
text string the title of the header style, it appears in Theme Panel -> Header -> Header Style
file string the path of the template file

Examples:

In the following example we’ll add Header Style 77 , you can see how the code looks on plugin, you have to modify the file path to match with the plugin current folder, we use the variables which were introduced in the Plugin Method section:

td_api_header_style::add('77',
    array(
        'text' => '<strong>Style 77 - </strong> default',
        'file' => $this->plugin_path . '/parts/header/header-style-77.php'
    )
);
Viewing all 280 articles
Browse latest View live